Simple Stylish JQuery Image Slideshow For Blogger

Today i want to bring you another neat Image slideshow for Blogger users.The slide show is simple to add to your blog, looks great and has some neat options.The width can be changed to the size of the area you want it placed on your blog, captions can also be added to the images.Once on your blog it will auto scroll through your images and also has controls for the user to manual scroll.This will look great on Photography Blogs, Business Blogs or for anyone looking to display some cool pics.
The original version comes from Basic jQuery Slider, i have made some changes to make it work better with blogger.Check out the demo below, i have the demo slider spanning the full width of the blog but as i said it can be changed.

The original version comes from Basic jQuery Slider, i have made some changes to make it work better with blogger.Check out the demo below, i have the demo slider spanning the full width of the blog but as i said it can be changed.

Add The Easy Image Slider To Your Blog
Remember Always Back Up Your Template Before You Make Changes - How To Back Up A Blogger Template
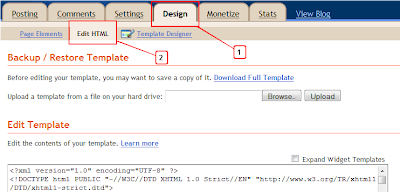
Step 1. In Your Blogger Dashboard Click Design > Edit Html

Step 2. Find the following piece of code in your blogs Html : (Click Ctrl and F for a search bar to help find the code - How To Find Code In Blogger Template Template)
Step 3. Copy and Paste the following code Directly Above / Before ]]></b:skin>
Step 4. Find the following piece of code in your blogs Html : (Click Ctrl and F for a search bar to help find the code - How To Find Code In Blogger Template Template)
Step 5. Now Copy And Paste This Code Directly Above / Before </head>
Important - The line of code in yellow is the jQuery script, if you previously added jQuery to your template leave it out.
The two lines in red and the width and height.The width is currently 940px and the height is 340px change them as needed.Remember your images will need to be the same size as the width and height you choose here.
Step 6. Save your template.
That's the Css and Scripts added now you need to add the html.To have the slider span across your full blog as in the demo you need a gadget area called Cross Column and can be seen in the image below.If your blog does not have this section available you can see how to enable it here - Add Full Width Cross Column Gadgets To Blogger.

Adding HTML For The Slides
The HTML for the slides goes in a Html/Javascript gadget in the cross column section as shown above.
Below is the html for the slider in the demo.There is no really easy way to explain it so you will need to take a minute to figure out the code.I have the the image URLs is in green and the caption (Optional) is in yellow.Each slide works in the same way, you can just copy and paste this code and replace the Image URL and captions.To add extra slides you can repeat one of the sections and once again add your URL, Image and Caption.
That's it, a bit of work needed hopefully you could follow it and have a great looking jQuery Image Slideshow.You can find more Featured Sliders In Our jQuery Posts.

No comments:
Post a Comment